背景
随着项目的不断壮大,从小型逐渐成长为大型,数据库中的数据量也在急剧增加。这导致某些关键领域的数据表承受巨大压力,查询性能逐渐下滑。此时,分库分表成为了一种必要的解决方案。
在项目中,我们采用了Spring框架进行开发,并使用MySQL作为数据库。为了实现与数据库的连接,我们引入了JDBC技术。考虑到项目的成本和技术要求,我们决定采用数据库中间件ShardingSphere来实现分库分表的功能。
分库分表的目的
- 优化性能:随着数据量的不断增长和业务的不断扩大,查询次数也会相应增加,导致服务器性能和响应速度下降,从而影响用户体验。为了解决这一问题,我们可以对一些数据量较大的表进行分表处理,这样可以显著提高查询性能。
- 高效管理:通过关键字段对数据库进行分表管理,使得数据库结构更为清晰。技术人员可以直接根据数据表名称查看到特定的数据部分,这使得数据库结构管理更为方便。
- 可扩展性:随着业务的不断发展和功能的增加,数据库可能会面临更大的请求压力。通过分库分表的处理,我们可以在未来的扩展中更加轻松地应对这些挑战,确保系统的稳定性和可扩展性。
介绍
ShardingSphere是开源的分布式数据库中间件生态圈,由Sharding-JDBC、Sharding-Proxy和Sharding-Sidecar组成。提供标准化的数据分片、分布式事务和数据库治理功能,适用于各种应用场景。
官方文档:https://shardingsphere.apache.org/document/legacy/3.x/document/cn/overview/
在项目中,我选择了Sharding-JDBC作为数据库中间件。它位于JAVA的JDBC层,为多种ORM框架(JPA、Hibernate、JDBC等)提供支持,并兼容Mysql和PostgreSQL等多种数据库。
环境
- Java
- Spring
- Mysql
- JPA
- Maven
- Sharding-JDBC
解决方案
分库与分表
在处理大规模数据和复杂业务时,分库分表成为了一种常见的解决方案。在决定采取分库或分表后,我们还需要深入考虑其具体实现方式。
分库
- 垂直分库:将特定的表从数据库中分离出来,放到另一个数据库中。例如,将订单表和支付单表分别存放在两个独立的数据库中。
- 水平分库:将每张表的部分数据迁移到其他数据库,确保每个数据库中的表结构和内容有所不同。
分表
- 垂直分表:当表字段过多导致结构复杂时,可以考虑将其拆分为多个表,并通过外键关联。例如,将用户的非身份信息(如兴趣、标签等)移至另一张名为user_detail的表中。
- 水平分表:将一张表的数据分布到多张结构相同的表中。例如,将用户表user拆分为user_1和user_2两张表,以降低单表的数据量。
ShardingShpere分片
在考虑到项目需求后我们决定使用水平分表,正好可以使用ShardingShpere的分片策略实现。
ShardingShpere的水平分片可以根据某个字段或者某几个字段,根据制定的规则将数据分散到多个表中,每一个分片仅包含一部分数据。比如根据表的id字段做分片,id为奇数放到一个表中,id为偶数放到另一个表中。
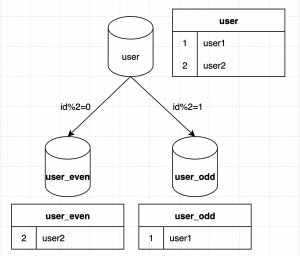
在这个场景中user表的id就是一个分片键,ShardingShpere可以支持按照分片键的=、between、in等方式分片。按照匹配分片键的方式可以分为不同的分片算法。
- 精准分片
- 范围分片
- 复合分片
- Hint分片
实现方式
引入依赖
<dependency>
    <groupId>io.shardingsphere</groupId>
    <artifactId>sharding-jdbc-core</artifactId>
    <version>${latest.release.version}</version>
</dependency>
代码实现
定义数据结构
@Entity
@Table(name = "user")
@Getter
@Setter
@NoArgsConstructor
public class User {
    @Id
    @GeneratedValue(strategy= GenerationType.IDENTITY)
    private Long userId;
    private String userName;
    private String status;
}
创建分表的表结构
create table user_1
(
    user_id bigint not null,
    user_name varchar(100) not null,
    status varchar(100) not null,
    constraint user_1_pk
        primary key (user_id)
);
create table user_2
(
    user_id bigint not null,
    user_name varchar(100) not null,
    status varchar(100) not null,
    constraint user_2_pk
        primary key (user_id)
);
配置分表策略
Sharding JDBC支持多种分表策略的配置方式,包括:使用yaml配置和使用ShardingAPI配置。
我将分别使用2个方式,完成对user表的分表,按照user_id的奇偶分别将数据放到user_1表和user_2表中。
- 使用yaml
spring:
  shardingsphere:
    mode:
      type: Memory
    datasource:
      names: ds-0
      ds-0:
        type: com.zaxxer.hikari.HikariDataSource
        driver-class-name: com.mysql.cj.jdbc.Driver
        url: jdbc:mysql://localhost:3306/user_db
        username: root
        password: root
    rules:
      sharding:
        tables:
          user:
            actual-data-nodes: ds-$->{0}.user_$->{1..2}
            table-strategy:
              standard:
                sharding-column: user_id
                sharding-algorithm-name: user_inline
            key-generate-strategy:
              column: user_id
              key-generator-name: snowflake
        sharding-algorithms:
          user_inline:
            type: INLINE
            props:
              algorithm-expression: user_$->{user_id % 2 + 1}
        key-generators:
          snowflake:
            type: SNOWFLAKE
            props:
              worker-id: 123
    props:
sql-show: true- 使用API
@Configuration
public class DataSourceConfiguration {

    @Bean
    public static DataSource getDataSource() throws SQLException {
         //构建运行模式
        ModeConfiguration modeConfig = new ModeConfiguration("Memory", null, false);

        // 配置数据源

        HikariDataSource dataSource = new HikariDataSource();
        dataSource.setDriverClassName("com.mysql.cj.jdbc.Driver");
        dataSource.setJdbcUrl("jdbc:mysql://localhost:3306/user_db");
        dataSource.setUsername("root");
        dataSource.setPassword("123456");

        Map<String, DataSource> dataSourceMap = new HashMap<>();
        dataSourceMap.put("ds0", dataSource);

        // 定义分片规则
        ShardingTableRuleConfiguration shardingTableRuleConfiguration = new ShardingTableRuleConfiguration("user",
                "ds-$->{0}.user_$->{1..2}");
        shardingTableRuleConfiguration.setTableShardingStrategy(new StandardShardingStrategyConfiguration("user_id", "user-inline"));
        shardingTableRuleConfiguration.setKeyGenerateStrategy(new KeyGenerateStrategyConfiguration("user_id",
                "snowflake"));

        // 定义分表算法
        Properties shardingTableInlineProps = new Properties();
        shardingTableInlineProps.setProperty("algorithm-expression", "user_$->{user_id % 2 + 1}");

        // 配置分表策略
        Map<String, ShardingSphereAlgorithmConfiguration> shardingAlgorithmConfigurationMap = new HashMap<>();
        shardingAlgorithmConfigurationMap.put("user-inline", new ShardingSphereAlgorithmConfiguration("INLINE",
                shardingTableInlineProps));

        // 定义自增列生成算法
        Properties shardingSnowFlakeProps = new Properties();
        shardingSnowFlakeProps.setProperty("worker-id", "123");

        // 配置自增列策略
        Map<String, ShardingSphereAlgorithmConfiguration> keyGeneratorsConfigurationMap = new HashMap<>();
        keyGeneratorsConfigurationMap.put("snowflake", new ShardingSphereAlgorithmConfiguration("SNOWFLAKE",
                shardingSnowFlakeProps));

        // 构建具体规则
        ShardingRuleConfiguration shardingRuleConfiguration = new ShardingRuleConfiguration();
        shardingRuleConfiguration.setTables(List.of(shardingTableRuleConfiguration, shardingTableRuleConfiguration));
        shardingRuleConfiguration.setShardingAlgorithms(shardingAlgorithmConfigurationMap);
        shardingRuleConfiguration.setKeyGenerators(keyGeneratorsConfigurationMap);

        /* 其他配置 */
        Properties otherProperties = new Properties();
        otherProperties.setProperty("sql-show", "true");

        // 获取数据源对象
        return ShardingSphereDataSourceFactory.createDataSource(dataSourceMap,
                List.of(shardingRuleConfiguration),
                otherProperties);
    }
}
⚠️注意事项
- 必须定义主键生成策略。
- 主键生成策略制定为SNOWFLAKE的话,主键需要为Long,对应数据库字段类型为bigint。主键生成策略制定为UDID的话,主键需要为String,对应数据库字段类型为varchar。
- 需要提前将分表的两个表user_1和user_2创建好。
测试数据插入时的分表情况
//使用jpa的数据仓库
@Repository
public interface UserRepository extends JpaRepository<User, Long> {
}
//测试数据插入
@Test
void save() {
IntStream.range(1, 10).forEach(i -> {
User user = new User();
user.setUserId(null);
user.setUserName("aaa");
user.setStatus("DONE");
userRepository.save(user);
});
}在运行测试后,user_1表中的数据如下,存放了user_id为偶数的数据

同时user_2表中的数据如下,存放了user_id为奇数的数据
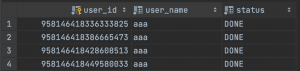
如此可以验证插入数据时的分表策略可以生效。
测试数据查询
@Test
void query() {
  userRepository.findAll().forEach(user -> {
    System.out.println(String.format("用户%s的id为%d", user.getUserName(), user.getUserId()));
  });
}
输出结果为:

如此可以验证分表后的数据依然可以通过jpa顺利获取。
留言